Automate your Functions
This tutorial shows you how to use Chainlink Automation to automate your Chainlink Functions. Automation is essential when you want to trigger the same function regularly, such as fetching weather data daily or fetching an asset price on every block.
Read the API multiple calls tutorial before you follow the steps in this example. This tutorial uses the same example but with an important difference:
- You will deploy AutomatedFunctionsConsumer.sol instead of FunctionsConsumer.sol.
AutomatedFunctionsConsumer.solis a Chainlink Functions Consumer contract that is Chainlink Automation compatible. After you deploy and set up your contract, Chainlink Automation triggers your function according to a time schedule.
Before you begin
-
Complete the setup steps in the Getting Started guide: The Getting Started Guide shows you how to set up your environment with the necessary tools for this tutorial.
-
Make sure to understand the API multiple calls guide.
-
Make sure your subscription has enough LINK to pay for your requests. See the Get Subscription Details page to learn how to check your subscription balance. If your subscription runs out of LINK, follow the Fund a Subscription guide.
-
Check out the tutorials branch of the Chainlink Functions Starter Kit. You can locate this tutorial in the /tutorials/6-multiple-apis directory.
git checkout tutorials -
Get a free API key from CoinMarketCap and note your API key.
-
The starter kit stores encrypted secrets as gists to share them off-chain with the Decentralized Oracle Network. To allow the starter kit to write gists on your behalf, create a github fine-grained personal access token.
- Visit Github tokens settings page.
- Click on Generate new token.
- Provide a name to your token and define the expiration date.
- Under
Account permissions, enable Read and write for Gists. Note: Do not enable additional settings. - Click on Generate token and copy your fine-grained personal access token.
-
Run
npx env-enc setto add an encryptedGITHUB_API_TOKENandCOINMARKETCAP_API_KEYto your.env.encfile.npx env-enc set
Tutorial
This tutorial is configured to get the median BTC/USD price from multiple data sources according to a time schedule. For a detailed explanation of the code example, read the Explanation section.
- Open
configjs. Note theargsvalue is["1", "bitcoin", "btc-bitcoin"]. These arguments are BTC IDs at CoinMarketCap, CoinGecko, and Coinpaprika. You can adaptargsto fetch other asset prices. See the API docs for CoinMarketCap, CoinGecko, and CoinPaprika for details. For more information about the request, read the request config section. - Open
source.jsto analyze the JavaScript source code. Read the source code explanation for a more detailed explanation of the request source file.
Simulation
The Chainlink Functions Hardhat Starter Kit includes a simulator to test your Functions code on your local machine. The functions-simulate command executes your code in a local runtime environment and simulates an end-to-end fulfillment. This helps you to fix issues before you submit functions to the Decentralized Oracle Network.
Run the functions-simulate task to run the source code locally and make sure config.js and source.js are correctly written:
npx hardhat functions-simulate --configpath REPLACE_CONFIG_PATHExample:
$ npx hardhat functions-simulate --configpath tutorials/6-multiple-apis/config.js
secp256k1 unavailable, reverting to browser version

__Compiling Contracts__
Nothing to compile
Duplicate definition of Transfer (Transfer(address,address,uint256,bytes), Transfer(address,address,uint256))

Executing JavaScript request source code locally...

__Console log messages from sandboxed code__
Median Bitcoin price: $28347.05

__Output from sandboxed source code__
Output represented as a hex string: 0x00000000000000000000000000000000000000000000000000000000002b4111
Decoded as a uint256: 2834705

__Simulated On-Chain Response__
Response returned to client contract represented as a hex string: 0x00000000000000000000000000000000000000000000000000000000002b4111
Decoded as a uint256: 2834705

Gas used by sendRequest: 398311
Gas used by client callback function: 75029
Reading the output of the example above, you can note that the BTC/USD median price is: 28347.05 USD. Because Solidity does not support decimals, we move the decimal point so that the value looks like the integer 2834705 before returning the bytes encoded value 0x00000000000000000000000000000000000000000000000000000000002b4111 in the callback. Read the source code explanation for a more detailed explanation.
Deploy an Automation Consumer contract
After running the simulator and confirming d that your Function runs without issues, run the functions-deploy-auto-client command. This command does the following:
- Deploy the AutomatedFunctionsConsumer.sol contract. You can set the interval of executions when deploying the contract.
- Add the deployed contract to your subscription.
- Simulate the request that is stored in your deployed contract.
- Store the request, which includes the source code, encrypted gist URL, and arguments in the contract storage. Note: The stored request is sent to the DON according to the provided time interval.
In your terminal, run the functions-deploy-auto-client command:
npx hardhat functions-deploy-auto-client --network REPLACE_NETWORK --subid REPLACE_SUBSCRIPTION_ID --interval REPLACE_INTERVAL_SECONDS --configpath REPLACE_CONFIG_PATHExample:
$ npx hardhat functions-deploy-auto-client --network polygonMumbai --subid 443 --interval 60 --configpath tutorials/6-multiple-apis/config.js
secp256k1 unavailable, reverting to browser version
Deploying AutomatedFunctionsConsumer contract to mumbai

__Compiling Contracts__
Nothing to compile

Waiting 1 block for transaction 0x6d68add0027ac0228c9e4b284fda4cedff87a2e73892545f8d34922e9fff338e to be confirmed...
Adding consumer contract address 0x6164Df3A2b2899124400c064306c74dA71804865 to subscription 443
Waiting 2 blocks for transaction 0x856e01a16b68bd273b44cd5935d451b334017eca238d5c90b93c415fe03238fd to be confirmed...

Added consumer contract address 0x6164Df3A2b2899124400c064306c74dA71804865 to subscription 443
2 authorized consumer contracts for subscription 443:
[
  '0x4B4BA2Fd6b93aDF8d6b6002E10540E58394388Ea',
  '0x6164Df3A2b2899124400c064306c74dA71804865'
]
Setting the Functions request in AutomatedFunctionsConsumer contract 0x6164Df3A2b2899124400c064306c74dA71804865 on mumbai
Simulating Functions request locally...

__Console log messages from sandboxed code__
Median Bitcoin price: $28365.03

__Output from sandboxed source code__
Output represented as a hex string: 0x00000000000000000000000000000000000000000000000000000000002b4817
Decoded as a uint256: 2836503

Successfully created encrypted secrets Gist: https://gist.github.com/aelmanaa/67631d9e07c58fd9903121947f2bf29e
Be sure to delete the Gist https://gist.github.com/aelmanaa/67631d9e07c58fd9903121947f2bf29e once encrypted secrets are no longer in use!

Setting Functions request

Waiting 2 block for transaction 0x2d14301323063d4f6e8e5910ffac4c2bfbea0fca7fcd39d6a76ce332c882da46 to be confirmed...

Created new Functions request in AutomatedFunctionsConsumer contract 0x6164Df3A2b2899124400c064306c74dA71804865 on mumbai

AutomatedFunctionsConsumer contract deployed to 0x6164Df3A2b2899124400c064306c74dA71804865 on mumbaiIn the example above, you deployed a Chainlink Functions consumer contract and configured it to get the median bitcoin price every 60 seconds.
Note: You can change the request's parameters to build a new request or update other parameters, such as the time interval or the subscription ID to which your contract is linked. To do so, run the functions-set-auto-request:
npx hardhat functions-set-auto-request --contract REPLACE_YOUR_CONTRACT --network REPLACE_NETWORK --subid REPLACE_SUBSCRIPTION_ID --interval REPLACE_INTERVAL_SECONDS --gaslimit REPLACE_GAS_LIMITS --configpath tutorials/6-multiple-apis/config.jsThe --interval and --gaslimit flags are optional.
As an example, you can use this command to set a new interval of one hour:
npx hardhat functions-set-auto-request --contract 0x6164Df3A2b2899124400c064306c74dA71804865 --network polygonMumbai --subid 443 --interval 3600 --configpath tutorials/6-multiple-apis/config.jsConfigure Chainlink Automation
The consumer contract that you deployed is designed to be used with a custom logic upkeep. Follow the instructions in the Registering an Upkeep guide to register your deployed contract using the Chainlink Automation App. Use the following upkeep settings:
- Trigger: Custom logic
- Target contract address: The address of the Chainlink Functions consumer contract that you deployed
- Gas limit: 700000
- Starting balance (LINK): 1
You can leave the other settings at their default values for the example in this tutorial.
Chainlink Automation will trigger sending the request according to your provided time interval.
Check Result
Go to the Chainlink Automation App and connect to Polygon Mumbai. Your upkeep will be listed under My upkeeps:

Click on your upkeep to fetch de details:
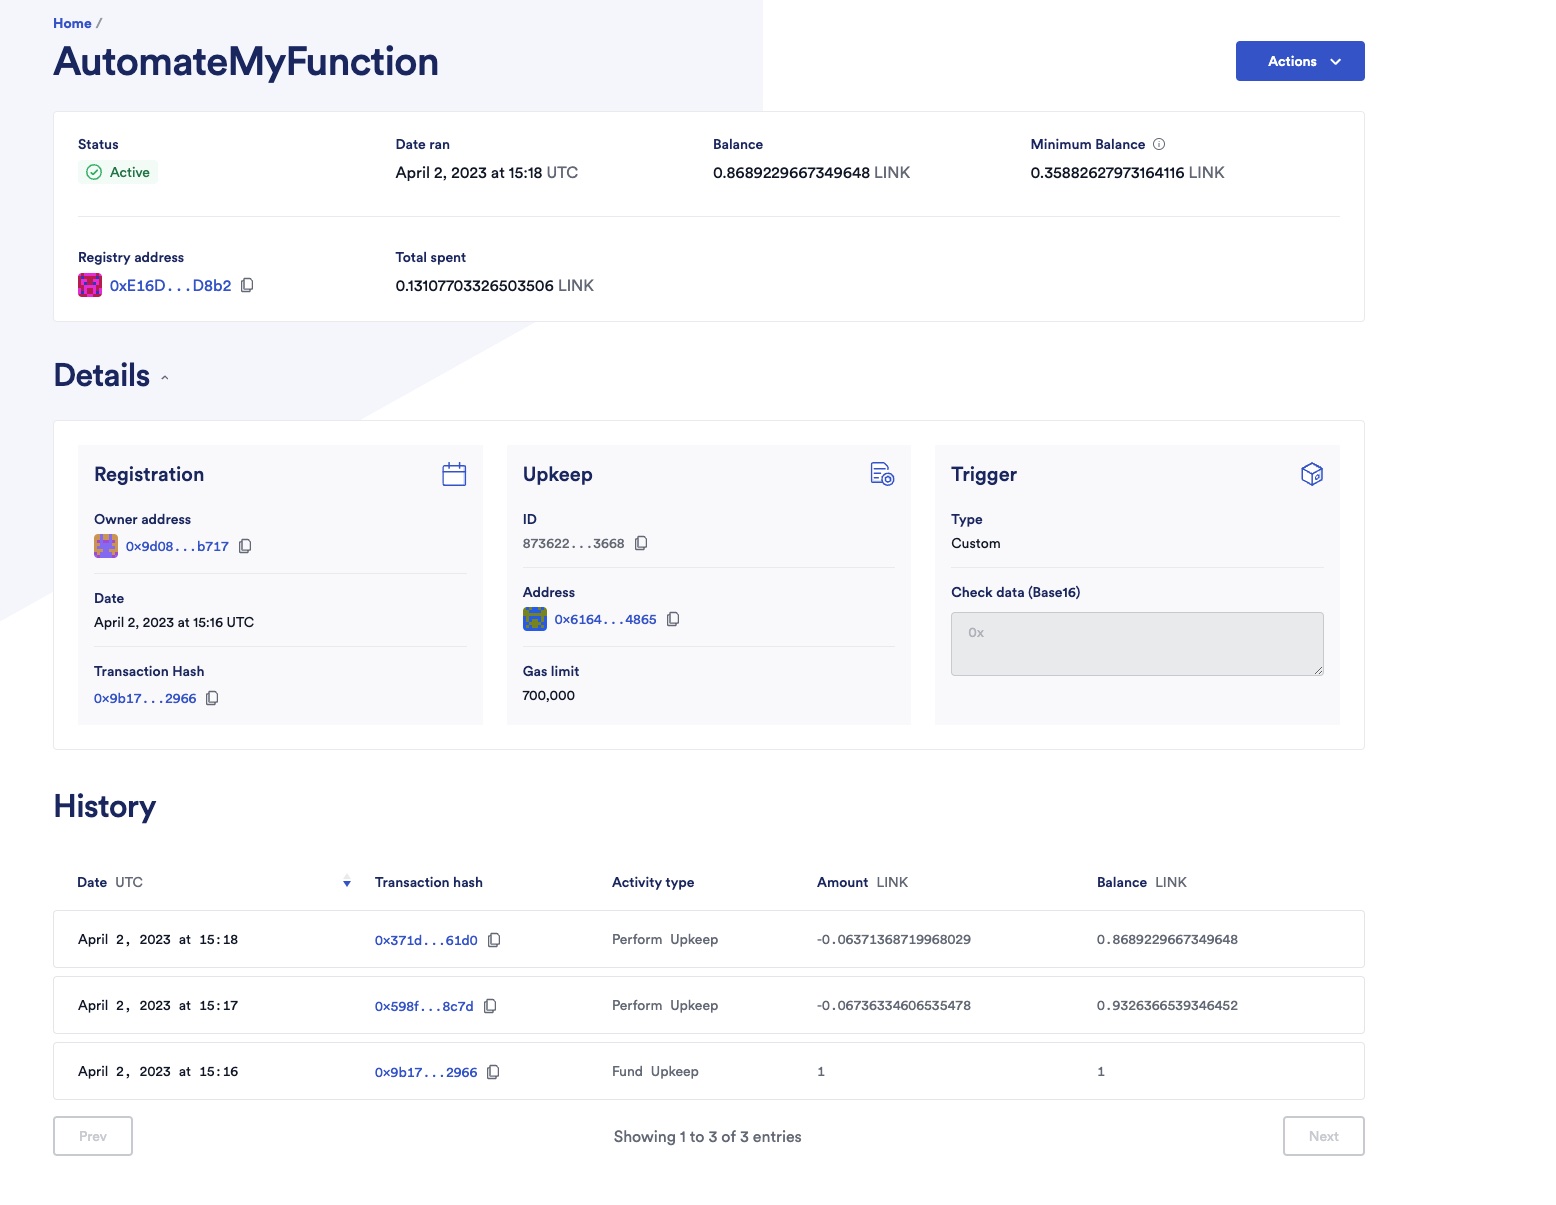
As you can see in the History table, the upkeep is running every minute.
On your terminal, run the functions-read task with the contract parameter to read the latest received response:
npx hardhat functions-read --contract REPLACE_CONSUMER_CONTRACT_ADDRESS --network REPLACE_NETWORK --configpath REPLACE_CONFIG_PATHExample:
$ npx hardhat functions-read  --contract 0x6164Df3A2b2899124400c064306c74dA71804865  --network polygonMumbai --configpath tutorials/6-multiple-apis/config.js
secp256k1 unavailable, reverting to browser version
Reading data from Functions client contract 0x6164Df3A2b2899124400c064306c74dA71804865 on network mumbai

On-chain response represented as a hex string: 0x00000000000000000000000000000000000000000000000000000000002af472
Decoded as a uint256: 2815090
Cleaning
After you finish the guide:
- Cancel your upkeep from the Chainlink Automation App. Note: Remember to withdraw funds after you cancel the upkeep. There is a 50-block delay once upkeep between the moment you cancel your upkeep and the moment you can withdraw funds.
- To delete the gist, run the
functions-clear-giststask with thecontractparameter.
npx hardhat functions-clear-gists --contract REPLACE_CONSUMER_CONTRACT_ADDRESS --network REPLACE_NETWORKExample:
$ npx hardhat functions-clear-gists --contract 0x6164Df3A2b2899124400c064306c74dA71804865 --network polygonMumbai
secp256k1 unavailable, reverting to browser version
Off-chain secrets Gist https://gist.github.com/aelmanaa/67631d9e07c58fd9903121947f2bf29e deleted successfully

All off-chain secret Gists for Automated Consumer 0x6164Df3A2b2899124400c064306c74dA71804865 have been deleted.
Explanation
AutomatedFunctionsConsumer.sol
To write a Chainlink Functions consumer contract, your contract must import FunctionsClient.sol. You can read the API reference: FunctionsClient. This contract is not available in an NPM package, so you must download and import it from within your project.
import {Functions, FunctionsClient} from "./dev/functions/FunctionsClient.sol";To create a Chainlink Automation contract, your contract must import AutomationCompatibleInterface from AutomationCompatible.sol
import {AutomationCompatibleInterface} from "@chainlink/contracts/src/v0.8/AutomationCompatible.sol";Import ConfirmedOwner from the @chainlink/contracts NPM package. This contract includes functions to set up the owner, transfer ownership, and a function modifier onlyOwner that restricts certain functions to the contract owner.
Your contract must inherit FunctionsClient and ConfirmedOwner contracts, and implement the AutomationCompatibleInterface interface.
contract AutomatedFunctionsConsumer is FunctionsClient, ConfirmedOwner, AutomationCompatibleInterfaceUse the Functions.sol library to get all the functions needed for building a Chainlink Functions request. You can read the API reference: Functions.
using Functions for Functions.Request;The request sent to Chainlink Functions is defined as a state variable. The contract owner stores this request, which is regularly sent to Chainlink Functions whenever Chainlink Automation triggers it.
bytes public requestCBORThe latest request ID, latest received response, and latest received error (if any) are defined as state variables. Note that latestResponse and latestError are encoded as dynamically sized byte array bytes, so you will still need to decode them to read the response or error:
bytes32 public latestRequestId;
bytes public latestResponse;
bytes public latestError;
The subscription ID (the subscription account your contract is linked to) and the fulfillment gas limit (Maximum amount of gas used to fulfill a Chainlink Function request) are defined as state variables. Only the contract owner can modify these variables.
uint64 public subscriptionId;
uint32 public fulfillGasLimit;
The update interval (time interval in seconds of triggering a Chainlink Function request) and the timestamp of the last request are defined as state variables. They are used to check if the time interval has been reached so that Chainlink Automation can trigger a new request.
uint256 public updateInterval;
uint256 public lastUpkeepTimeStamp;
Define upkeepCounter and responseCounter to keep track of the number of requests (triggered by Chainlink Automation) and the number of fulfilled requests (once the request has been fulfilled by Chainlink Functions).
Define the OCRResponse event that your smart contract will emit during the callback:
event OCRResponse(bytes32 indexed requestId, bytes result, bytes err);Pass the oracle address for your network, your Chainlink functions ID, fulfillment gas limit, and update interval when you deploy the contract:
constructor(
  address oracle,
  uint64 _subscriptionId,
  uint32 _fulfillGasLimit,
  uint256 _updateInterval
) FunctionsClient(oracle) ConfirmedOwner(msg.sender)
You can change the oracle address at any time by calling the updateOracleAddress function.
To store a request in the requestCBOR state variable, the contract owner has to:
-
Call the
generateRequestfunction. It uses theFunctionslibrary to initialize the request and add any passed encrypted secrets or arguments. Finally, it returns an encoded request. You can read the API Reference for Initializing a request, adding secrets, and adding arguments. Note: This call is done off-chain to save gas when calling thesetRequestfunction.Functions.Request memory req; req.initializeRequest(Functions.Location.Inline, Functions.CodeLanguage.JavaScript, source); if (secrets.length > 0) { req.addRemoteSecrets(secrets); } if (args.length > 0) req.addArgs(args); return req.encodeCBOR(); -
Call the
setRequestfunction and pass the subscription ID, fulfillment gas limit, update interval, and the encoded request (returned bygenerateRequest).setRequestupdates theupdateInterval,subscriptionId,fulfillGasLimit, andrequestCBORstate variables.
checkUpkeep and performUpkeep functions are used by Chainlink Automation:
-
checkUpkeep: Returns a boolean which determines whether Chainlink Automation can trigger theperformUpkeepfunction. The boolean is set to true whenever the time interval is met.upkeepNeeded = (block.timestamp - lastUpkeepTimeStamp) > updateInterval; -
performUpkeep: Sends the request to the oracle by calling theFunctionsClientsendRequestfunction. You can read the API reference for sending a request. Also, it updateslastUpkeepTimeStampwith the current timestamp, incrementsupkeepCounter, and setslatestRequestIdto the last request ID.lastUpkeepTimeStamp = block.timestamp; upkeepCounter = upkeepCounter + 1; ... bytes32 requestId = s_oracle.sendRequest( subscriptionId, requestCBOR, fulfillGasLimit ); ... latestRequestId = assignedReqID;
fulfillRequest is invoked by Chainlink Functions during the callback. This function is defined in FunctionsClient as virtual (read fulfillRequest API reference). So, your smart contract must override the function to implement the callback. The implementation of the callback is straightforward: the contract stores the latest response and error in latestResponse and latestError and increments responseCounter before emitting the OCRResponse event.
latestResponse = response;
latestError = err;
responseCounter = responseCounter + 1;
emit OCRResponse(requestId, response, err);
config.js
See the explanation for the Call Multiple Data Sources tutorial.
source.js
See the explanation for the Call Multiple Data Sources tutorial.